Tutorial Menampilkan LED dot matrix MAX7219 Arduino

بِسْــــــــــــــــــمِ اللهِ الرَّحْمَنِ الرَّحِيْمِ
Untuk tutorial ini, saya akan menggunakan MD_Parola yang dikombinasikan dengan pustaka Arduino MD_MAX72XX. Pustaka ini membuat tampilan teks bergulir dan animasi lainnya menjadi sangat mudah. Pada bagian pertama artikel ini, saya akan membahas dasar-dasar pencetakan teks pada tampilan. Selanjutnya, kita akan melihat teks bergulir dan animasi teks lainnya. Terakhir, saya akan menunjukkan cara menggunakan sprite teks.
Jika Anda ingin mempelajari lebih lanjut tentang jenis tampilan lainnya, lihat artikel di bawah ini:

Komponen :
- 8×32 MAX7219 LED dot matrix display
- Arduino Uno Rev3
- Jumper wires (male to female)
- USB cable type A/B
- Male headers
- Jumpers

- 8×32 MAX7219 LED dot matrix display
- Arduino Uno Rev3
- Jumper wires (male to female)
- USB cable type A/B
- Male headers
- Jumpers
Software :Arduino IDE
Tentang driver LED MAX7219
Driver LED MAX7219 dapat digunakan untuk mengontrol tampilan 7-segmen hingga 8 digit, tampilan grafik batang, atau 64 LED individual. Pengemudi berkomunikasi dengan Arduino melalui SPI sehingga Anda hanya membutuhkan tiga kabel untuk mengontrol tampilan.
Karena MAX7219 dapat mengontrol maksimal 64 LED, ukuran maksimum tampilan dot matrix yang dapat digerakkan adalah 8 × 8 piksel. Namun, Anda dapat menghubungkan beberapa driver dan matriks bersama-sama dan dengan mudah mengontrol tampilan yang jauh lebih besar seperti 8 × 32, 8 × 64, atau bahkan lebih besar. Namun, Anda hanya perlu tiga kabel untuk mengontrol semua IC sehingga Anda hanya memerlukan sedikit pin I / O Arduino.
Di bawah ini Anda dapat menemukan spesifikasi dari layar dot matrix MAX7219 8 × 32 LED tipikal.
Spesifikasi tampilan dot matrix LED MAX7219
| Operating voltage | 5 V |
| Display driver | MAX7219 x 4 |
| Brightness levels | 16 |
| Display dimensions | 32 x 128 x 15 mm |
| Pixels | 8×32, ⌀ 3 mm |
| Datasheet | MAX7219 |
Cara menghubungkan tampilan dot matrix ke Arduino
Driver tampilan LED MAX7219 berkomunikasi dengan Arduino melalui SPI (Serial Peripheral Interface). Dengan antarmuka SPI selalu ada satu perangkat master (Arduino) yang mengontrol perangkat periferal (juga dikenal sebagai budak). Anda dapat mengontrol tampilan baik melalui antarmuka SPI mikrokontroler AVR Arduino atau tiga pin digital sembarang (perangkat lunak SPI).
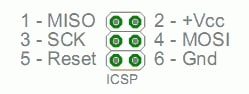
Pin SPI perangkat keras (MOSI, MISO, dan SCK) berada di lokasi tertentu di setiap papan Arduino. Antarmuka ini lebih cepat daripada menggunakan perangkat lunak SPI, tetapi Anda perlu menggunakan pin keluaran tetap berikut:
Lokasi pin SPI Hardware
| Board | MOSI | MISO | SCK | Level |
|---|---|---|---|---|
| Arduino Uno | 11 or ICSP-4 | 12 or ICSP-1 | 13 or ICSP-3 | 5 V |
| Arduino Mega | 51 or ICSP-4 | 50 or ICSP-1 | 52 or ICSP-3 | 5 V |
| Arduino Leonardo | ICSP-4 | ICSP-1 | ICSP-3 | 5 V |
| Arduino Due | SPI-4 | SPI1 | SPI-3 | 3.3 V |
| Arduino MKR1000 | 8 | 10 | 9 | 3.3 V |
- MOSI (Master Out Slave In) terhubung ke DIN - Jalur Master mengirim data ke periferal.
- SCK (Serial Clock) terhubung ke CLK - Jam berdenyut yang menyinkronkan transmisi data yang dihasilkan oleh master.
- SS (Slave Select) terhubung ke CS - Pin pada setiap perangkat yang dapat digunakan master untuk mengaktifkan dan menonaktifkan perangkat tertentu.

| MAX7219 Display | Arduino |
|---|---|
| VCC | 5 V |
| GND | GND |
| DIN | 11 (MOSI) |
| CS | 3 (SS) |
| CLK | 13 (SCK) |
install seperti yg digambar MD

    DP A  B  C  D  E  F  G
         +------------------------+
         | 7  6  5  4  3  2  1  0 | D0
 CLK <---|                      1 | D1 <--- CLK
  CS <---|                      2 | D2 <--- CS
DOUT <---|                      3 | D3 <--- DIN
 GND ----|                   O  4 | D4 ---- GND
 VCC ----|                O  O  5 | D5 ---- VCC
         |             O  O  O  6 | D6
         |          O  O  O  O  7 | D7
         +------------------------+
Code Test 1
#include <MD_Parola.h>
#include <MD_MAX72xx.h>
#include <SPI.h>

// Define hardware type, size, and output pins:
#define HARDWARE_TYPE MD_MAX72XX::FC16_HW
#define MAX_DEVICES 4
#define CS_PIN 3

// Create a new instance of the MD_Parola class with hardware SPI connection:
MD_Parola myDisplay = MD_Parola(HARDWARE_TYPE, CS_PIN, MAX_DEVICES);

// Setup for software SPI:
// #define DATAPIN 2
// #define CLK_PIN 4
// MD_Parola myDisplay = MD_Parola(HARDWARE_TYPE, DATA_PIN, CLK_PIN, CS_PIN, MAX_DEVICES);

void setup() {
  // Intialize the object:
  myDisplay.begin();
  // Set the intensity (brightness) of the display (0-15):
  myDisplay.setIntensity(0);
  // Clear the display:
  myDisplay.displayClear();
   myDisplay.displayText("Sinau Programming", PA_CENTER, 100, 0, PA_SCROLL_LEFT, PA_SCROLL_LEFT);
}

void loop() {


  // myDisplay.displayText("Sinau Programming", PA_CENTER, 100, 0, PA_SCROLL_LEFT, PA_SCROLL_LEFT);


    if (myDisplay.displayAnimate()) {
        myDisplay.setTextAlignment(PA_CENTER);
  myDisplay.print("Center");
  delay(2000);
  myDisplay.setTextAlignment(PA_LEFT);
  myDisplay.print("Left");
  delay(2000);
  myDisplay.setTextAlignment(PA_RIGHT);
  myDisplay.print("Right");

  delay(2000);
  myDisplay.setTextAlignment(PA_CENTER);
  myDisplay.setInvert(true);
  myDisplay.print("Invert");
  delay(2000);
  myDisplay.setInvert(false);
  myDisplay.print(1234);
  delay(2000);

  }
  delay(100);
}
Bagaimana kodenya bekerja
Bagian pertama dari kode hingga akhir bagian penyiapan sama persis dengan contoh sebelumnya. Di akhir bagian penyiapan, kami menentukan bagaimana kami ingin menampilkan teks dengan fungsi displayText (pText, align, speed, pause, effectIn, effectOut). Fungsi ini membutuhkan 5 argumen.
Parameter pertama adalah string teks, dalam hal ini "Teks bergulir".
Argumen kedua mengatur perataan teks selama jeda opsional. Anda dapat menggunakan opsi perataan yang sama seperti pada contoh sebelumnya, yaitu PA_CENTER, PA_LEFT, atau PA_RIGHT.
Argumen ketiga dan keempat mengatur kecepatan animasi dan waktu jeda masing-masing. Kecepatan tampilan adalah waktu dalam milidetik antar frame animasi. Semakin rendah kali ini semakin cepat animasinya. Jika Anda ingin menjeda teks di antara animasi masuk dan keluar, Anda dapat menyetel waktu jeda dalam milidetik. Saya mengaturnya ke nol sehingga teks bergulir terus menerus.
Selanjutnya, efek masuk dan keluar ditentukan. Dalam hal ini saya menggunakan PA_SCROLL_LEFT untuk keduanya. Lihat contoh di bawah untuk efek teks lainnya.
Pada library menyertakan beberapa efek teks lain yang bisa Anda gunakan:
- PA_PRINT,
- PA_SCAN_HORIZ,
- PA_SCROLL_LEFT,
- PA_WIPE,
- PA_SCROLL_UP_LEFT,
- PA_SCROLL_UP,
- PA_OPENING_CURSOR,
- PA_GROW_UP,
- PA_MESH,
- PA_SCROLL_UP_RIGHT,
- PA_BLINDS,
- PA_CLOSING,
- PA_RANDOM,
- PA_GROW_DOWN,
- PA_SCAN_VERT,
- PA_SCROLL_DOWN_LEFT,
- PA_WIPE_CURSOR,
- PA_DISSOLVE,
- PA_OPENING,
- PA_CLOSING_CURSOR,
- PA_SCROLL_DOWN_RIGHT,
- PA_SCROLL_RIGHT,
- PA_SLICE,
- PA_SCROLL_DOWN
Code Test 2
#include <MD_Parola.h>
#include <MD_MAX72xx.h>
#include <SPI.h>
int i = 0;
textEffect_t texteffect[] =
{
  PA_PRINT,
  PA_SCAN_HORIZ,
  PA_SCROLL_LEFT,
  PA_WIPE,
  PA_SCROLL_UP_LEFT,
  PA_SCROLL_UP,
  PA_OPENING_CURSOR,
  PA_GROW_UP,
  PA_MESH,
  PA_SCROLL_UP_RIGHT,
  PA_BLINDS,
  PA_CLOSING,
  PA_RANDOM,
  PA_GROW_DOWN,
  PA_SCAN_VERT,
  PA_SCROLL_DOWN_LEFT,
  PA_WIPE_CURSOR,
  PA_DISSOLVE,
  PA_OPENING,
  PA_CLOSING_CURSOR,
  PA_SCROLL_DOWN_RIGHT,
  PA_SCROLL_RIGHT,
  PA_SLICE,
  PA_SCROLL_DOWN
};
// Define hardware type, size, and output pins:
#define HARDWARE_TYPE MD_MAX72XX::FC16_HW
#define MAX_DEVICES 4
#define CS_PIN 3
// Create a new instance of the MD_Parola class with hardware SPI connection:
MD_Parola myDisplay = MD_Parola(HARDWARE_TYPE, CS_PIN, MAX_DEVICES);
// Setup for software SPI:
// #define DATAPIN 2
// #define CLK_PIN 4
// MD_Parola myDisplay = MD_Parola(HARDWARE_TYPE, DATA_PIN, CLK_PIN, CS_PIN, MAX_DEVICES);
void setup() {
  myDisplay.begin();
  myDisplay.setIntensity(0);
  myDisplay.setTextAlignment(PA_CENTER);
  myDisplay.setPause(1000);
  myDisplay.setSpeed(100);
  myDisplay.displayClear();
}
void loop() {
  if (myDisplay.displayAnimate()) {
    if (i < sizeof(texteffect)) {
      i++;
    }
    else {
      i = 0;
    }
    myDisplay.displayText("Hello", myDisplay.getTextAlignment(), myDisplay.getSpeed(), myDisplay.getPause(), texteffect[i], texteffect[i]);
    myDisplay.displayReset();
  }
}
Text sprites
Fungsi yang relatif baru dari pustaka MD_Parola adalah sprite teks animasi. Dalam grafik komputer, sprite adalah bitmap dua dimensi yang diintegrasikan ke dalam pemandangan yang lebih besar (dalam hal ini, tampilan matriks).
Sebuah sprite terdiri dari sejumlah frame yang berjalan secara berurutan untuk membuat animasi pada tampilan. Setelah animasi mencapai bingkai terakhir, animasi dimulai ulang dari bingkai pertama.
Code Test 3
#include <MD_Parola.h>
#include <MD_MAX72xx.h>
#include <SPI.h>
// Define hardware type, size, and output pins:
#define HARDWARE_TYPE MD_MAX72XX::FC16_HW
#define MAX_DEVICES 4
#define CS_PIN 3
int var =0;
// Create a new instance of the MD_Parola class with hardware SPI connection:
MD_Parola myDisplay = MD_Parola(HARDWARE_TYPE, CS_PIN, MAX_DEVICES);
// Setup for software SPI:
// #define DATAPIN 2
// #define CLK_PIN 4
// MD_Parola myDisplay = MD_Parola(HARDWARE_TYPE, DATA_PIN, CLK_PIN, CS_PIN, MAX_DEVICES);
// Sprite definitions:
const uint8_t F_PMAN1 = 6;
const uint8_t W_PMAN1 = 8;
const uint8_t PROGMEM pacman1[F_PMAN1 * W_PMAN1] =  // gobbling pacman animation
{
  0x00, 0x81, 0xc3, 0xe7, 0xff, 0x7e, 0x7e, 0x3c,
  0x00, 0x42, 0xe7, 0xe7, 0xff, 0xff, 0x7e, 0x3c,
  0x24, 0x66, 0xe7, 0xff, 0xff, 0xff, 0x7e, 0x3c,
  0x3c, 0x7e, 0xff, 0xff, 0xff, 0xff, 0x7e, 0x3c,
  0x24, 0x66, 0xe7, 0xff, 0xff, 0xff, 0x7e, 0x3c,
  0x00, 0x42, 0xe7, 0xe7, 0xff, 0xff, 0x7e, 0x3c,
};
const uint8_t F_PMAN2 = 6;
const uint8_t W_PMAN2 = 18;
const uint8_t PROGMEM pacman2[F_PMAN2 * W_PMAN2] =  // pacman pursued by a ghost
{
  0x00, 0x81, 0xc3, 0xe7, 0xff, 0x7e, 0x7e, 0x3c, 0x00, 0x00, 0x00, 0xfe, 0x7b, 0xf3, 0x7f, 0xfb, 0x73, 0xfe,
  0x00, 0x42, 0xe7, 0xe7, 0xff, 0xff, 0x7e, 0x3c, 0x00, 0x00, 0x00, 0xfe, 0x7b, 0xf3, 0x7f, 0xfb, 0x73, 0xfe,
  0x24, 0x66, 0xe7, 0xff, 0xff, 0xff, 0x7e, 0x3c, 0x00, 0x00, 0x00, 0xfe, 0x7b, 0xf3, 0x7f, 0xfb, 0x73, 0xfe,
  0x3c, 0x7e, 0xff, 0xff, 0xff, 0xff, 0x7e, 0x3c, 0x00, 0x00, 0x00, 0xfe, 0x7b, 0xf3, 0x7f, 0xfb, 0x73, 0xfe,
  0x24, 0x66, 0xe7, 0xff, 0xff, 0xff, 0x7e, 0x3c, 0x00, 0x00, 0x00, 0xfe, 0x7b, 0xf3, 0x7f, 0xfb, 0x73, 0xfe,
  0x00, 0x42, 0xe7, 0xe7, 0xff, 0xff, 0x7e, 0x3c, 0x00, 0x00, 0x00, 0xfe, 0x7b, 0xf3, 0x7f, 0xfb, 0x73, 0xfe,
};
const uint8_t F_WAVE = 14;
const uint8_t W_WAVE = 14;
const uint8_t PROGMEM wave[F_WAVE * W_WAVE] =  // triangular wave / worm
{
  0x08, 0x04, 0x02, 0x01, 0x02, 0x04, 0x08, 0x10, 0x20, 0x40, 0x80, 0x40, 0x20, 0x10,
  0x10, 0x08, 0x04, 0x02, 0x01, 0x02, 0x04, 0x08, 0x10, 0x20, 0x40, 0x80, 0x40, 0x20,
  0x20, 0x10, 0x08, 0x04, 0x02, 0x01, 0x02, 0x04, 0x08, 0x10, 0x20, 0x40, 0x80, 0x40,
  0x40, 0x20, 0x10, 0x08, 0x04, 0x02, 0x01, 0x02, 0x04, 0x08, 0x10, 0x20, 0x40, 0x80,
  0x80, 0x40, 0x20, 0x10, 0x08, 0x04, 0x02, 0x01, 0x02, 0x04, 0x08, 0x10, 0x20, 0x40,
  0x40, 0x80, 0x40, 0x20, 0x10, 0x08, 0x04, 0x02, 0x01, 0x02, 0x04, 0x08, 0x10, 0x20,
  0x20, 0x40, 0x80, 0x40, 0x20, 0x10, 0x08, 0x04, 0x02, 0x01, 0x02, 0x04, 0x08, 0x10,
  0x10, 0x20, 0x40, 0x80, 0x40, 0x20, 0x10, 0x08, 0x04, 0x02, 0x01, 0x02, 0x04, 0x08,
  0x08, 0x10, 0x20, 0x40, 0x80, 0x40, 0x20, 0x10, 0x08, 0x04, 0x02, 0x01, 0x02, 0x04,
  0x04, 0x08, 0x10, 0x20, 0x40, 0x80, 0x40, 0x20, 0x10, 0x08, 0x04, 0x02, 0x01, 0x02,
  0x02, 0x04, 0x08, 0x10, 0x20, 0x40, 0x80, 0x40, 0x20, 0x10, 0x08, 0x04, 0x02, 0x01,
  0x01, 0x02, 0x04, 0x08, 0x10, 0x20, 0x40, 0x80, 0x40, 0x20, 0x10, 0x08, 0x04, 0x02,
  0x02, 0x01, 0x02, 0x04, 0x08, 0x10, 0x20, 0x40, 0x80, 0x40, 0x20, 0x10, 0x08, 0x04,
  0x04, 0x02, 0x01, 0x02, 0x04, 0x08, 0x10, 0x20, 0x40, 0x80, 0x40, 0x20, 0x10, 0x08,
};
const uint8_t F_ROLL1 = 4;
const uint8_t W_ROLL1 = 8;
const uint8_t PROGMEM roll1[F_ROLL1 * W_ROLL1] =  // rolling square
{
  0xff, 0x8f, 0x8f, 0x8f, 0x81, 0x81, 0x81, 0xff,
  0xff, 0xf1, 0xf1, 0xf1, 0x81, 0x81, 0x81, 0xff,
  0xff, 0x81, 0x81, 0x81, 0xf1, 0xf1, 0xf1, 0xff,
  0xff, 0x81, 0x81, 0x81, 0x8f, 0x8f, 0x8f, 0xff,
};
const uint8_t F_ROLL2 = 4;
const uint8_t W_ROLL2 = 8;
const uint8_t PROGMEM roll2[F_ROLL2 * W_ROLL2] =  // rolling octagon
{
  0x3c, 0x4e, 0x8f, 0x8f, 0x81, 0x81, 0x42, 0x3c,
  0x3c, 0x72, 0xf1, 0xf1, 0x81, 0x81, 0x42, 0x3c,
  0x3c, 0x42, 0x81, 0x81, 0xf1, 0xf1, 0x72, 0x3c,
  0x3c, 0x42, 0x81, 0x81, 0x8f, 0x8f, 0x4e, 0x3c,
};
const uint8_t F_LINES = 3;
const uint8_t W_LINES = 8;
const uint8_t PROGMEM lines[F_LINES * W_LINES] =  // spaced lines
{
  0xff, 0xff, 0xff, 0x00, 0x00, 0xff, 0x00, 0x00,
  0xff, 0xff, 0x00, 0xff, 0x00, 0x00, 0xff, 0x00,
  0xff, 0xff, 0x00, 0x00, 0xff, 0x00, 0x00, 0xff,
};
const uint8_t F_ARROW1 = 3;
const uint8_t W_ARROW1 = 10;
const uint8_t PROGMEM arrow1[F_ARROW1 * W_ARROW1] =  // arrow fading to center
{
  0x18, 0x3c, 0x7e, 0xff, 0x7e, 0x00, 0x00, 0x3c, 0x00, 0x00,
  0x18, 0x3c, 0x7e, 0xff, 0x00, 0x7e, 0x00, 0x00, 0x18, 0x00,
  0x18, 0x3c, 0x7e, 0xff, 0x00, 0x00, 0x3c, 0x00, 0x00, 0x18,
};
const uint8_t F_ARROW2 = 3;
const uint8_t W_ARROW2 = 9;
const uint8_t PROGMEM arrow2[F_ARROW2 * W_ARROW2] =  // arrow fading to outside
{
  0x18, 0x3c, 0x7e, 0xe7, 0x00, 0x00, 0xc3, 0x00, 0x00,
  0x18, 0x3c, 0x7e, 0xe7, 0xe7, 0x00, 0x00, 0x81, 0x00,
  0x18, 0x3c, 0x7e, 0xe7, 0x00, 0xc3, 0x00, 0x00, 0x81,
};
const uint8_t F_SAILBOAT = 1;
const uint8_t W_SAILBOAT = 11;
const uint8_t PROGMEM sailboat[F_SAILBOAT * W_SAILBOAT] =  // sail boat
{
  0x10, 0x30, 0x58, 0x94, 0x92, 0x9f, 0x92, 0x94, 0x98, 0x50, 0x30,
};
const uint8_t F_STEAMBOAT = 2;
const uint8_t W_STEAMBOAT = 11;
const uint8_t PROGMEM steamboat[F_STEAMBOAT * W_STEAMBOAT] =  // steam boat
{
  0x10, 0x30, 0x50, 0x9c, 0x9e, 0x90, 0x91, 0x9c, 0x9d, 0x90, 0x71,
  0x10, 0x30, 0x50, 0x9c, 0x9c, 0x91, 0x90, 0x9d, 0x9e, 0x91, 0x70,
};
const uint8_t F_HEART = 5;
const uint8_t W_HEART = 9;
const uint8_t PROGMEM heart[F_HEART * W_HEART] =  // beating heart
{
  0x0e, 0x11, 0x21, 0x42, 0x84, 0x42, 0x21, 0x11, 0x0e,
  0x0e, 0x1f, 0x33, 0x66, 0xcc, 0x66, 0x33, 0x1f, 0x0e,
  0x0e, 0x1f, 0x3f, 0x7e, 0xfc, 0x7e, 0x3f, 0x1f, 0x0e,
  0x0e, 0x1f, 0x33, 0x66, 0xcc, 0x66, 0x33, 0x1f, 0x0e,
  0x0e, 0x11, 0x21, 0x42, 0x84, 0x42, 0x21, 0x11, 0x0e,
};
const uint8_t F_INVADER = 2;
const uint8_t W_INVADER = 10;
const uint8_t PROGMEM invader[F_INVADER * W_INVADER] =  // space invader
{
  0x0e, 0x98, 0x7d, 0x36, 0x3c, 0x3c, 0x36, 0x7d, 0x98, 0x0e,
  0x70, 0x18, 0x7d, 0xb6, 0x3c, 0x3c, 0xb6, 0x7d, 0x18, 0x70,
};
const uint8_t F_ROCKET = 2;
const uint8_t W_ROCKET = 11;
const uint8_t PROGMEM rocket[F_ROCKET * W_ROCKET] =  // rocket
{
  0x18, 0x24, 0x42, 0x81, 0x99, 0x18, 0x99, 0x18, 0xa5, 0x5a, 0x81,
  0x18, 0x24, 0x42, 0x81, 0x18, 0x99, 0x18, 0x99, 0x24, 0x42, 0x99,
};
const uint8_t F_FBALL = 2;
const uint8_t W_FBALL = 11;
const uint8_t PROGMEM fireball[F_FBALL * W_FBALL] =  // fireball
{
  0x7e, 0xab, 0x54, 0x28, 0x52, 0x24, 0x40, 0x18, 0x04, 0x10, 0x08,
  0x7e, 0xd5, 0x2a, 0x14, 0x24, 0x0a, 0x30, 0x04, 0x28, 0x08, 0x10,
};
const uint8_t F_CHEVRON = 1;
const uint8_t W_CHEVRON = 9;
const uint8_t PROGMEM chevron[F_CHEVRON * W_CHEVRON] =  // chevron
{
  0x18, 0x3c, 0x66, 0xc3, 0x99, 0x3c, 0x66, 0xc3, 0x81,
};
const uint8_t F_WALKER = 5;
const uint8_t W_WALKER = 7;
const uint8_t PROGMEM walker[F_WALKER * W_WALKER] =  // walking man
{
  0x00, 0x48, 0x77, 0x1f, 0x1c, 0x94, 0x68,
  0x00, 0x90, 0xee, 0x3e, 0x38, 0x28, 0xd0,
  0x00, 0x00, 0xae, 0xfe, 0x38, 0x28, 0x40,
  0x00, 0x00, 0x2e, 0xbe, 0xf8, 0x00, 0x00,
  0x00, 0x10, 0x6e, 0x3e, 0xb8, 0xe8, 0x00,
};
void setup() {
  myDisplay.begin();
  myDisplay.setIntensity(6);
  myDisplay.displayClear();
  myDisplay.setSpriteData(fireball,W_FBALL,F_FBALL,fireball,W_FBALL,F_FBALL);
  myDisplay.displayText("Sinau", PA_CENTER, 40, 500, PA_SPRITE, PA_SPRITE);
}
void loop() {
switch (var) {
  case 0:
                if (myDisplay.displayAnimate()) {
                myDisplay.print(1234);
               delay(1000);
               myDisplay.displayClear();
               myDisplay.setSpriteData(heart,W_HEART,F_HEART,heart,W_HEART,F_HEART);
               myDisplay.displayText("Haris", PA_CENTER, 40, 100, PA_SPRITE, PA_SPRITE);
                 myDisplay.displayReset();
                  delay(50);
                  var=1;
                 }
              break;
  case 1:
             if (myDisplay.displayAnimate()) {
               myDisplay.displayClear();
               myDisplay.setSpriteData(pacman2,W_PMAN2,F_PMAN2,pacman2,W_PMAN2,F_PMAN2);
               myDisplay.displayText("lightace", PA_CENTER, 50, 500, PA_SPRITE, PA_SPRITE);
               myDisplay.displayReset();
             var=2;}

    break;
  case 2:
    if (myDisplay.displayAnimate()) {
                  myDisplay.displayClear();
                   myDisplay.setSpriteData(walker,W_WALKER,F_WALKER,walker,W_WALKER,F_WALKER);
                     myDisplay.displayText("program", PA_CENTER, 45, 100, PA_SPRITE, PA_SPRITE);
                       myDisplay.displayReset();
                       delay(50);
                       var=3;
                      }
    break;
    case 3:
     if (myDisplay.displayAnimate()) {
                 myDisplay.displayClear();
                myDisplay.setSpriteData(chevron,W_CHEVRON,F_CHEVRON,chevron,W_CHEVRON,F_CHEVRON);
                myDisplay.displayText("Dot", PA_CENTER, 35, 200, PA_SPRITE, PA_SPRITE);
                  myDisplay.displayReset();
                       delay(50);
                       var=4;
                      }
    break;
     case 4:
                if (myDisplay.displayAnimate()) {
                  myDisplay.displayClear();
                     myDisplay.setSpriteData(rocket,W_ROCKET,F_ROCKET,rocket,W_ROCKET,F_ROCKET);
                    myDisplay.displayText("Matrik", PA_CENTER, 40, 100, PA_SPRITE, PA_SPRITE);
                  myDisplay.displayReset();
                       var=5;
                      }
    break;
    case 5:
                if (myDisplay.displayAnimate()) {
                 myDisplay.print("ON");
                delay(1000);
                myDisplay.displayClear();
                myDisplay.setSpriteData(sailboat,W_SAILBOAT,F_SAILBOAT,sailboat,W_SAILBOAT,F_SAILBOAT);
                 myDisplay.displayText("8x32", PA_CENTER, 40, 1000, PA_SPRITE, PA_SPRITE);
                myDisplay.displayReset();
                       var=6;
                      }
    break;

     case 6:
           if (myDisplay.displayAnimate()) {
                 myDisplay.displayClear();
                  myDisplay.setSpriteData(steamboat,W_STEAMBOAT,F_STEAMBOAT,steamboat,W_STEAMBOAT,F_STEAMBOAT);
                  myDisplay.displayText("Animasi", PA_CENTER, 25, 1000, PA_SPRITE, PA_SPRITE);
                   myDisplay.displayReset();
                       var=7;
                      }
    break;

       case 7:
          if (myDisplay.displayAnimate()) {
                 myDisplay.displayClear();
                myDisplay.setSpriteData(wave,W_WAVE,F_WAVE ,wave,W_WAVE,F_WAVE );
                 myDisplay.displayText("Animasi", PA_CENTER, 25, 1000, PA_SPRITE, PA_SPRITE);
                 myDisplay.displayReset();
                       var=0;
                      }
    break;
  default:

    break;
}


}
Semoga bermanfaat 💪💓😚
اَللّـٰــهُمَّ صَلِّ عَـلـٰى سَيَّـدِنَـا مُحَمَّدٍ وَعَـلـٰى أَلِ سَيِّـدِنَا مُحَمَّدٍ وَعَلـٰى أَهْلِ بَــيْـتِهِ


